Fruit Logistica Berlin
Clear blue sky at the annual Fruit Logistica in Berlin View more »

Marchfelder Eryngii
A nice basket wiith king oyster mushroom produced by Marchfelder Bio-Edelpilze, Austria. View more »
Phase 1: pre-treatment and fermentation
Martin van de Vorle
martin@mushroomconsultancy.com
Phase 1 has changed immensely over the past 20 years. The arrival of indoor tunnels and bunkers, shorter production cycles and the obligatory reduction of odour emissions have all radically changed the methods used in phase 1 and the philosophy surrounding composting accordingly. However, the ultimate aim of phase 1 remains unchanged: creating a selective substrate.
The production process of phase 1 can be divided into preparatory stage and fermentation.
Pre-treatment
In practice there is a huge difference in the time taken to pre-treat the material in phase 1. If horse manure is used these preparations can be done in just a single day, but it’s advisable to spend several days mixing raw materials like horse manure and straw (respectively 1 to 2 and 4 to 6 days on a floor or in a bunker) until a homogenous blend is achieved. In this way the moisture is actually absorbed and less water will seep out of the blended materials during phase 1. Despite good absorption, there will always be some moisture that trickles away in the first day of phase 1. A large part of this water will drain out of the bunker or tunnel, but even so the lower layer of the substrate will still be wetter, with the risk of anaerobic patches.
My usual method with straw substrate is to bring the moisture content in the beginning up to around 70 to 72%, add 15% of the chicken manure and then turning it properly by using a mixing or turning machine. In the following days the moisture content can be increased in stages. The materials must be regularly mixed using a loader to prevent anaerobic patches forming. On the day the mixture is filled, add the rest of the chicken manure, the gypsum and another 1 to 2% of the moisture and mix everything thoroughly using a mixing or turning machine.
Nitrogen
Another point to consider, is adding nitrogen. The most commonly used sources of nitrogen in Europe are chicken manure, ammonium sulphate and urea. Chicken manure is an ideal source of nitrogen because it contains many minerals and trace elements, and it is cheap. If a straw substrate is used, plenty of chicken manure must be added – up to 70 to 90%. The decreasing nitrogen content of chicken manure in the past 10 years (approximately 20%), which consequently means more has to be added, combined with the shorter blades of straw, has resulted in a denser and greasier substrate. Any lumpy particles in the chicken manure will not be well fermented after phase 2 and can cause green mould later on in phase 3. Therefore I advise using dry chicken manure without any large lumps and if the manure is lumpy, grind it to finer pieces. It’s also a good plan to mix it through the gypsum when it is supplied. This method ensures fewer odours to be released during storage and it has absolutely no negative effect on the substrate. Another nitrogen source is ammonium sulphate. There are some who use this as a substitute for chicken manure to prevent the substrate becoming too greasy and to lower the pH at inoculation. A kilo of ammonium sulphate per ton of phase 1 material, lowers the pH at inoculation by about 0.1. Another reason for its use is that it is a waste product from ammonia scrubbers. If only chicken manure is used and the phase 1 is good, the pH will already be around 7.5, so adding ammonium sulphate is unnecessary. As well as this product, urea is also sometimes used, both as a source of nitrogen and to soften the straw. If too high temperatures are used in phase 1 (higher than 80 °C), the materials will become too soft.
Pressure
For an optimal fermentation process the moisture and ammonia contents are crucially important. The amount of ammonia that can be absorbed by the compost depends on the moisture content. For fermentation a high moisture content of approximately 75% is needed. To achieve this 4500 to 5000 litres of water are added to each ton of dry straw. Together with the chicken manure and gypsum (65 kg per ton dry straw) the blend, which started off as a ton of dry straw, weighs around 6 tons when the phase 1 compost is filled. The blend is black and very dense. As the moisture content is almost at the maximum level that can be absorbed by the material, some of the water drains down to the lower layer during the first day after filling. In combination with the weight of the upper layers, this creates a very dense lower layer. A very high pressure of 4000 to 5000 Pascal is required to aerate this dense mass. As the lowest layer is the most dense and compact, there is a greater risk that no air reaches the material here. So this layer is the most susceptible to anaerobic patches which occur in the first 15 hours following the filing of phase 1. By mixing again after 24 hours the lower layer is mixed with the rest, then aerated and so its condition will recover. At the end of phase 1 (fermentation) the aim is to have a moisture content of approximately 74 to 75%, a nitrogen content of 2%, an NH4 content of 0.65% and a pH of around 8.6.
Fermentation
The combustion of easily decomposable organic compounds during fermentation releases heat and the temperature increases sharply. At this stage the thermophilic microflora take over from mesophilic organisms. The activity of this microflora pushes up the temperature until it reaches the point where there are almost only chemical reactions. The high temperatures (higher than 70 °C) create a lot of ammonia. These two factors together soften and decompose the straw. If a blend does not rise above 70 °C in phase 1, the easily decomposable organic structures will not be broken down sufficiently. The blend will also have a high pH after fermentation, and will produce bad quality mushrooms later on. Normally the temperature rises to above 70 °C in about 18 hours. Then the temperature of the blend must continue to rise to approximately 78 °C. To avoid the wet lower layer becoming anaerobic, I advise removing the compost from the tunnel, mixing it and filling it into another tunnel 24 hours after filling. After 2 to 3 days at around 78 °C, repeat the process and allow the temperature to rise to 78 °C again. After another 4 days the temperature of the blend will start to fall. During the entire process the compost will turn dark brown. This change should already be clearly visible when the compost is moved to another tunnel for the second time.
Oxygen
At a temperature above 80 °C too much structure will be lost in the material and it will become too soft. From experience we know that if the material rises above 80 °C during this period, the usual cause is al lack of oxygen. To ensure combusting the easily decomposable organic compounds proceeds smoothly, an oxygen content of approximately 8% is required in a continually aerated phase 1 system. This equates to a temperature rise of 2 to 3 °C per hour with an on/off ventilation system. If the oxygen content is too low or high, the temperature development will be too fast or slow. If the fan is off, there is a risk of a chimney effect being created in the material. I strongly recommend to avoid this. The chimney effect sucks air through the compost when the fan is off. This is done at low pressure so the air fails to reach all parts of the compost. This less than optimal distribution of air causes differences in the material. The on/off activation times of the fan will be based on measurements that are not representative for the entire bulk. This means that part of the blend will experience erratic temperature development and will deviate widely in uniformity when filled in phase 2. The compost will vary from an anaerobic state, to being overloaded with actinomycetes. This type of compost usually has a lower pH, as well as a lower NH3 and NH4 content when filled in phase 2. If too little fresh air is introduced during fermentation, the temperature will rise very fast and the process will produce a lot of odour. Fermentation will only take place on the surface. The straw in the material will turn into a bluish black or a shiny yellowy green. This process can be compared with charcoal production. If the oxygen content is too high there will be little or no temperature rise, or the temperature may even fall. During the first 5 to 6 hours a lot of fresh air is needed due to the increasing activity of the thermophilic microflora. As the easily decomposable organic compounds fall in number during fermentation, the activity decreases and therefore the volume of air required too. The aeration time should be regularly shortened. Up to 60 °C the fan is constantly active, afterwards the computer must calculate how long the fan should be active/idle up to the required 78 °C. Adjusting these intervals manually is almost impossible.
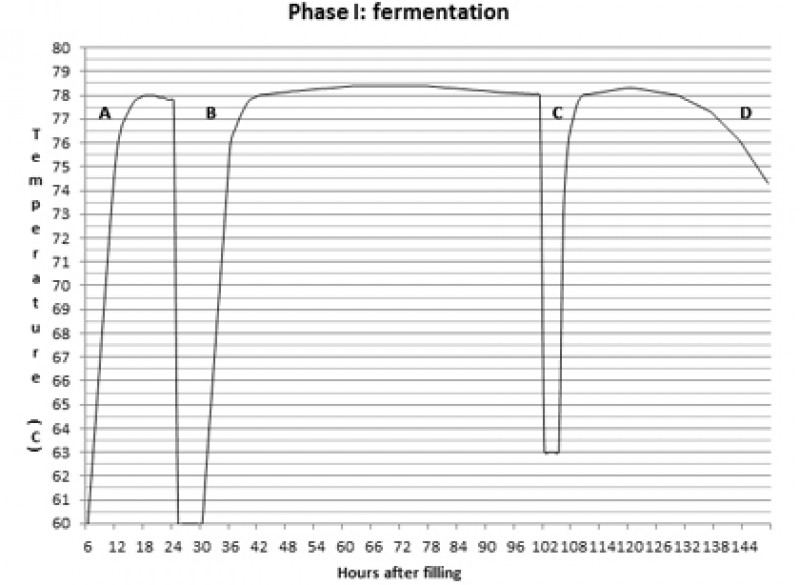
Diagram of fermentation process
A: The blend contains a lot of easily decomposable organic material and needs plenty of oxygen.
B. In the first 12 hours water seeps out of the material during the periods when the fan is switched off. In the meantime, the lower layer becomes wetter, so anaerobic patches can occur. Removing the blend, mixing it and placing it in another tunnel (after 24 hours) mixes this layer through the rest.
C: After 3 to 4 days move the blend into another tunnel and mix so the outer layer can ferment better.
D: If the temperature continues to fall, switch quickly to phase 2. Waiting too long has a negative effect on good for phase 2.